What's The Best Hobby Grade RC Car To Start With?
8/2/2023
Hello fellow RC enthusiasts from around the world. I hope you are all well.
When I was first getting into RC cars, the choice of cars, batteries, servo's, transmitters and receivers, it was very daunting as I was a complete novice with zero experience in any area of the hobby. I learned the hard way, by buying the wrong stuff, breaking it and fixing it. I also read magazines from cover to cover and slowly, over the years I gained some experience. I remember those days so well and wish I'd had someone to guide me through the pitfalls I would fall into.
Therefore.
In this post, I will share my thoughts on buying your first hobby grade RC car. I will try and show you a couple of the car's I would choose for a beginner or novice. What with rising bills and funds being low for everyone, I'm going to try and show you what is good to buy as a beginner and what to avoid.
There will be many enthusiasts to this day that will tell you, we have all made the same mistakes. This post will hopefully help you to avoid the same mistakes and save some money. To help the budget, I will write the stages as I would buy the items required, in the following stages. Obviously you do not need to follow my stages, but it could help save you some money.
For the purpose of this post, I will not mention brushless motors, brushless ESC's or LiPo batteries as these are aimed more for race setups or high end RC's and are quite expensive.

Your Choice Of RC Car
At this point it is good to remember, there are a lot more components to complete a running RC car and budget is the main aim here, so I will try to get the best car we could buy for the least cash outlay.
There are literally hundreds of RC cars to choose from with many different classes and grades. There are two main grades,
1) Toy grade.
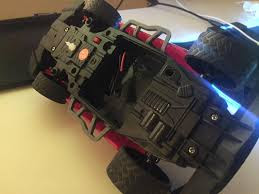
Toy grade RC cars look like the cars in the two pictures above. Normally the battery box is located at the bottom as can be seen. As their class title suggests, they are toys and are not repairable, upgradeable or reliable.

After a short life they end up looking like the car above, total and useless scrap. Non of the parts can be reused nor replaced. Don't get me wrong, I am not against these cars. I have bought them for my children to play with over the years and they have enjoyed many hours driving them.

The thing is, when they break, it's game over as the parts for them will be few and far between, if not non existent.

2) Hobby grade.
Hobby grade cars are only normally available from specialised hobby stores. I have never seen a hobby grade RC car available in a supermarket. However, some toy stores do sell hobby grade cars. One difference between the hobby and toy grade cars is that the parts on the hobby grade car can be replaced and can be repaired. However, the hobby grade car is a lot more complex and quite a lot more expensive but the options, parts available and longevity of car make it the wise choice. In fact, it may turn out as an investment in time.
Firstly, I would only buy a NEW car. Buying a second hand one is almost always false economy. You will end up spending a small fortune on replacement parts and things that will be missing from the car. I would also advise to buy the car in kit form. The build process will help you repair the car in the future. Believe me, you will break it and that's why I have chosen these cars. Spares are readily available and cheap to buy. No worries finding replacement parts. Obviously there are many other hobby grade RC car manufacturers out there, but I've never heard or had a problem with a Tamiya kit so here we go. BTW, I am not sponsored by Tamiya in any way or form.
My Choice
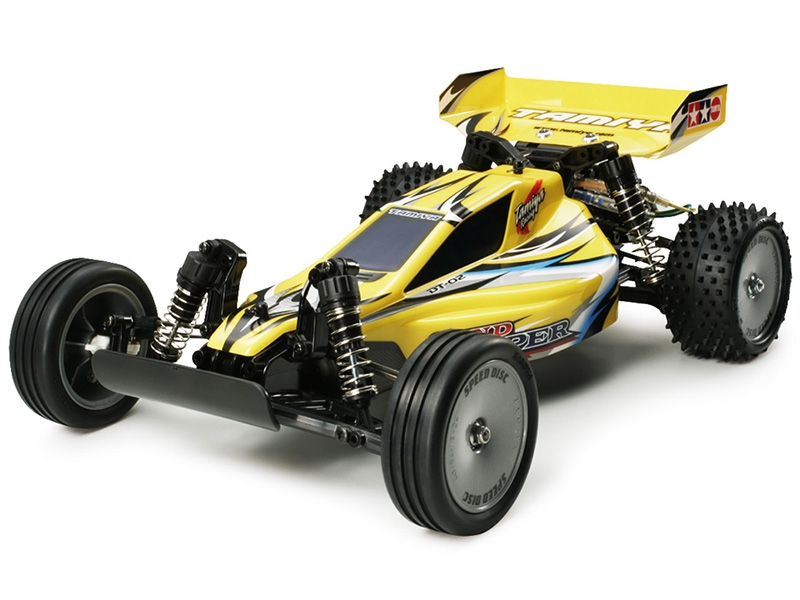
Tamiya Holiday Buggy (58470) on the DT-02 chassis.

It comes in kit form, but it will be very simple to assemble what with the tools, greases and instructions within the kit. It retails at £109 in the UK and is supplied with a type 380 motor and an electronic speed controller. I think that is a bargain. This car is an entry level hobby grade car. A lot of people vastly under rate this car, simply because it is an entry level model. The fact of the matter is, as this is a hobby grade car, there are many, many tune-up options available to turn this good little car into a great little car. The friction damper assemblies can be replaced with oil filled CVA damper assemblies for £22. The type 380 motor can be upgraded to a 540 type motor with a bracket that is readily available. I would also advise the replacement of all of the plastic bushings for the proper shielded bearings kit that only cost £14. However, these tune up parts can be bought at a later date. You don't have to do them, but at least there's room for those upgrades in the future.

The pictures below are some highly customised and beautiful Holiday Buggy examples.
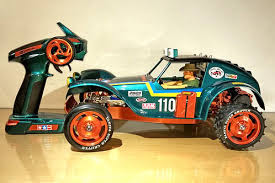
Above is a picture of a totally custom Holiday buggy, with a colour coordinated controller. It has an alloy chassis, alloy damper assemblies and custom paint. I can only imagine the money that has gone into building this beautiful RC car.

Above is a picture of another custom built Holiday Buggy. This time sporting caterpillar tracks at the rear and snow ski's at the front. Wow, what a build.

The picture above shows the bathtub chassis, which are very strong and keep a lot of the dirt out. Again, the motor and differential and also covered to keep out any debris or dirt. You can also see the buggy is fitted with double wishbone suspension on all four corners.
As I previously stated, this car is supplied with a motor and an electronic speed controller which will also save you some money as these components are not always supplied in kit form. Some may argue that the electronic speed controllers are not very good, nor is the motor but my response is, this is a beginners car that can, if the owner wants, be highly upgraded. The motor is aimed at the novice but the speed controllers are indeed, very good. To put it another way, buying those components separate, would be an extra £35 at least. As this kit is also available without the electronic speed controller, be careful and choose the correct kit you require.
I previously stated, this model with the motor and ESC is £109 and I think it's outstanding value for the money. I also stated what tune up parts to buy, which would have come to around another £35.
BUT
Instead of spending the initial £109, plus £35, how about spending only £129 and have all those tune ups already included?
What about this.
Tamiya Sand Viper (58374) also on the DT-02 chassis.
As you can see the Sand Viper has the typical race buggy styling and layout. The Sand Viper (in my humble opinion) is the better option for the money. The kit is supplied with a full shielded bearing kit. It's equipped with oil filled damper assemblies as standard. It comes with a 540 type motor (faster and bigger than a type 380) as standard. And to be fair this would be a fast and agile race buggy from the outset. It might not be the fastest buggy on track, but at least you can compete with the fast cars of this class.

The picture above shows the upgraded parts that the Holiday Buggy does NOT have.
I myself would pay the extra £20 in a heartbeat for all those extra tune up parts and all that extra speed. However, the choice is yours.
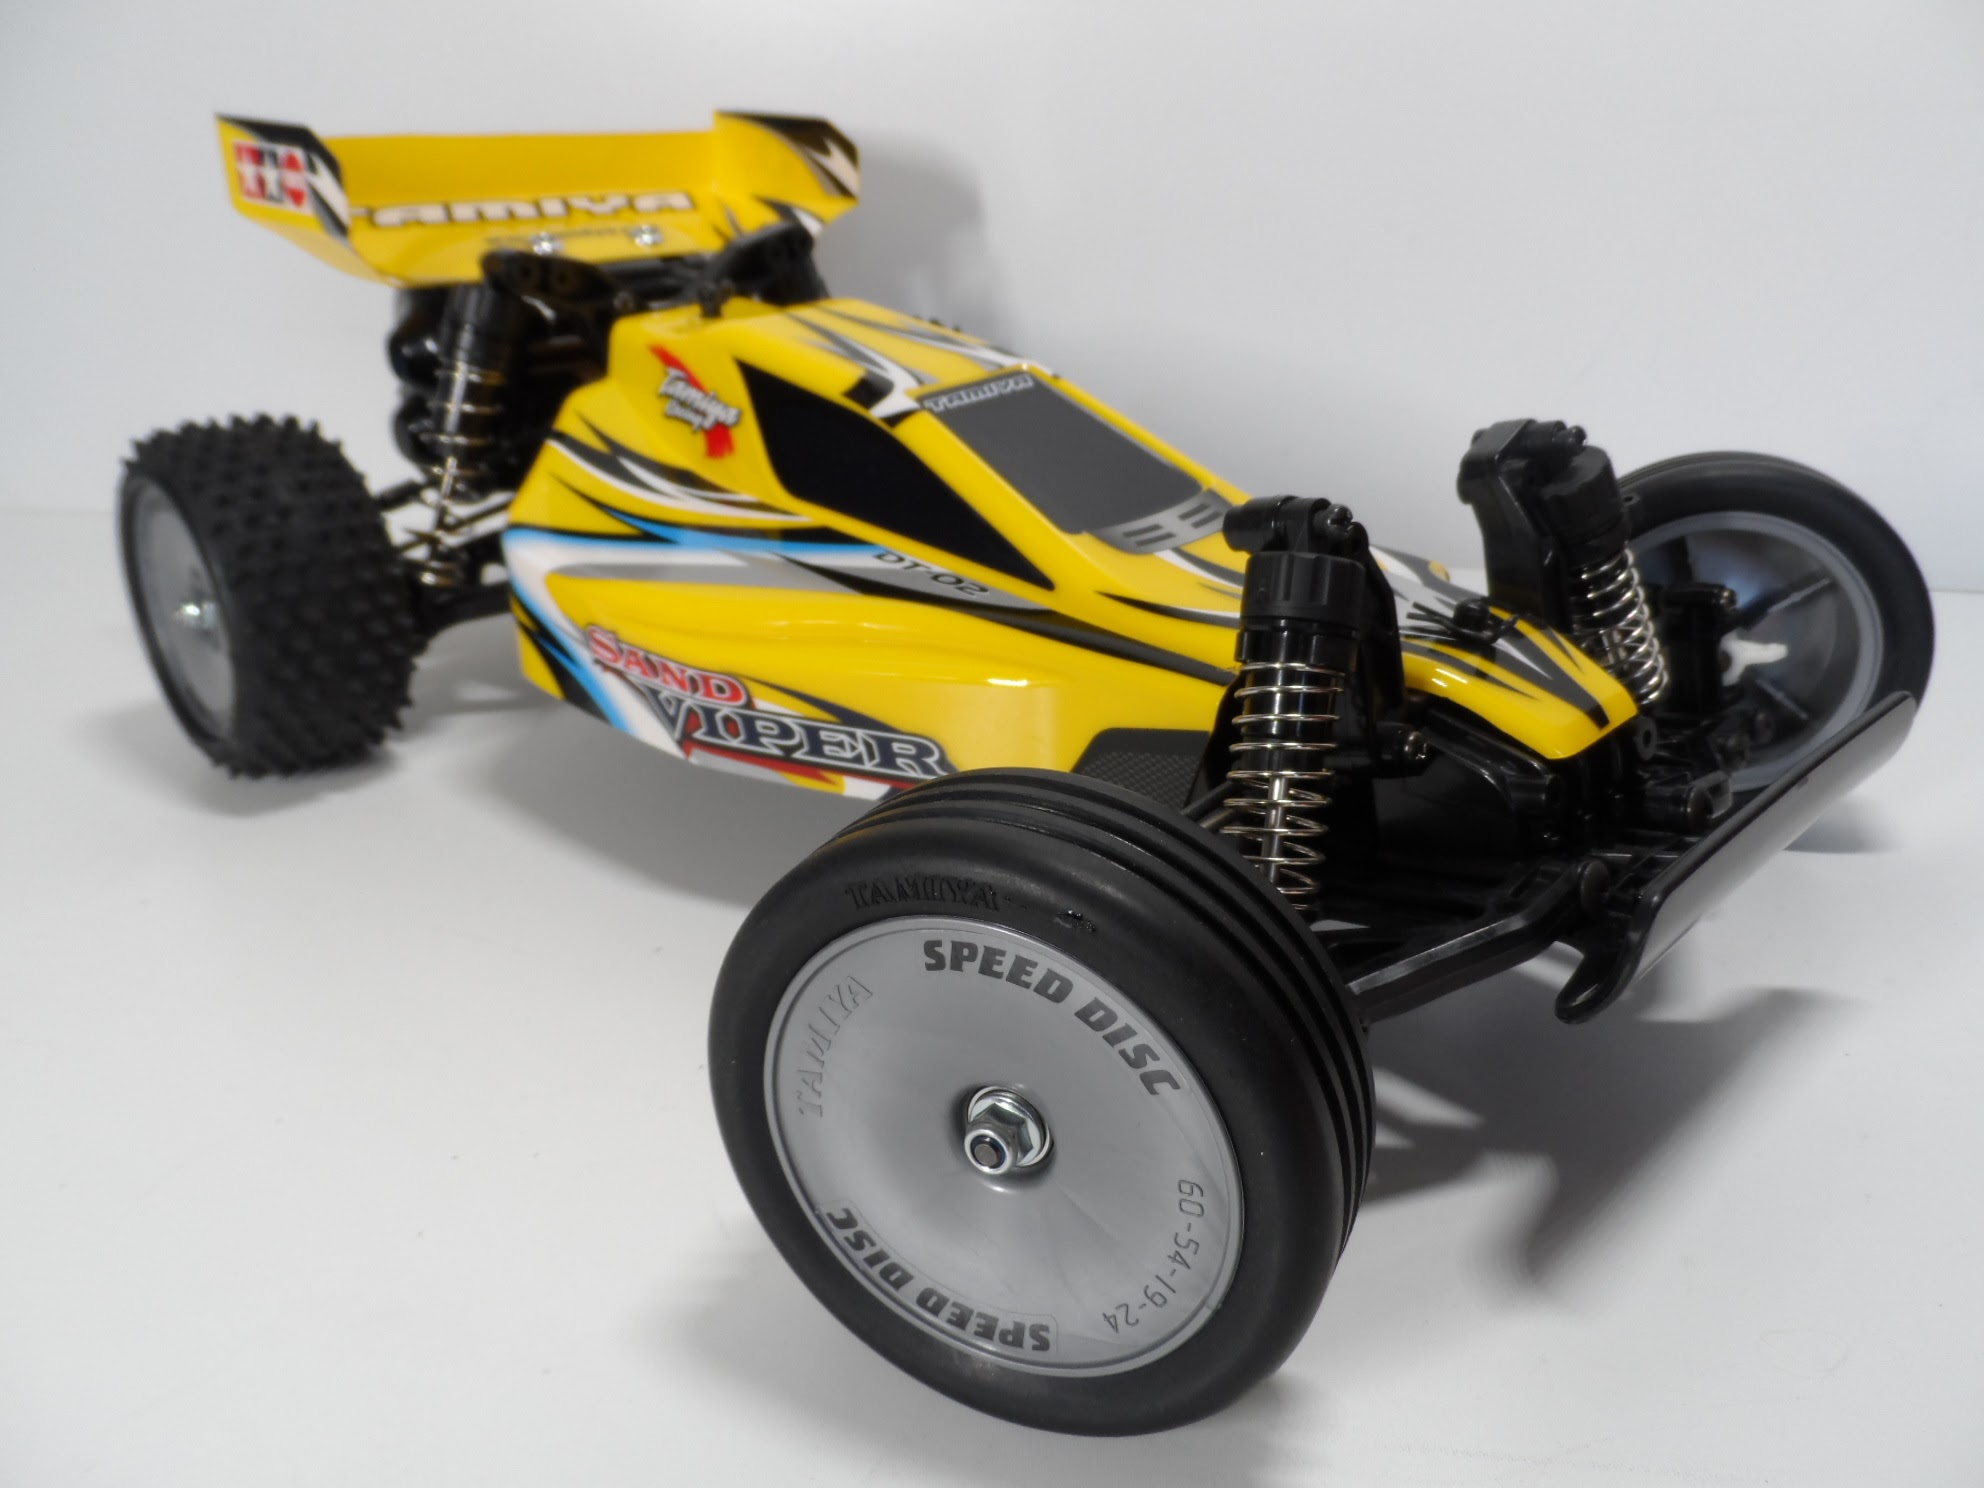
Another view of the Sand Viper. I think this buggy, is very pretty and it will be quick out of the box. You could obviously use you own colour scheme before painting and there is a massive choice of wheels and tyres that will look awesome on this car. If you can afford another £20, this is the car to have.
The Build
(My Favourite Part)
My advice to a novice builder, would always be take your time. Read the instructions/manual first to get familiar with the tools, components and where they can be found in the kit. This will certainly help save time and effort. Remember the model may take many hours to complete so don't expect to have it running after only a couple of hours. Be patient with the build, learn it and enjoy building it (my favourite part).
Steering Servo.
All RC car kits I have ever built, were never supplied with a steering servo. These buggies will also require a steering servo. I will normally choose and buy the steering servo before I start the build as some kits are built around the servos. I doubt that would be the case here, but I would choose a half decent steering servo and can be used in future RC cars if you wish.

Again, there are many servo's to choose from and at reasonable prices. My choice would be the Alturn AAS-752MG. It has full metal gearing and is a high speed servo which is ideal for quick steering. It comes with many fitment components and servo disks/horns. I have used this servo in my Schumacher LD with superb results and never an issues to report. The servo above cost me £16 it is very good. There are cheaper servo's to be bought, but they unreliable, plastic gears and cheap plastic that will split easily.

A couple of Alturn servo's that I have had for years and never had a problem with them. I have owned some very expensive servo's over the years, but the expense isn't justified when these servos can do the same job for a quarter of the price.
Electronic Speed Controller (ESC) & Motor
If the car or kit you are purchasing is not supplied with an ESC or motor, then you will need to buy them separately. I would at this point recommend buying the ESC and Motor in a combo package. I say this as they will be matched for each other. Major problems will arise if the motor you intend to use is too powerful for the ESC, it will burn it out. For example, I have a 27 turn ESC and a 13 turn motor however, I cannot run them together as the motor will draw more current than the ESC can handle resulting in the ESC being permanently damaged and the possibility of causing a fire.

Above are two of my ESC's. The top ESC is a Quicrun 1060 brushed system that can handle a motor with 13 turns or more. The Viper ESC at the bottom can only run motors with 27 turns or more. Both of these ESC's claim to be waterproof, but I have never tested that feature. They were approx £25 each delivered. I must say that the Quicrun is the easiest to use and can handle higher power brushed motors.

Above is a picture of a combo package ESC and motor and was advertised at £28 including delivery. There are many manufacturers out there supplying these matched sets for a reasonable price with delivery included.

Above is a picture of a typical Tamiya "Silver Can" motor. Albeit this is a sport tuned motor, it is still a silver can motor. They are a great beginners motor, very reliable and can take a beating. However, this is a sealed motor so when it breaks (which will take a long time), it cannot be rebuilt.

Transmitter (TX) and Receiver (RX)
I would advise only to buy a 2.4 GHz RX & TX.
To control the RC car we need a Transmitter and receiver. The receiver is connected to steering servo and the ESC. For an RC car we will only need a two channel transmitter and receiver. This is because we only need to control the steering and the throttle/brake.
Above is a picture of my two channel transmitter I have used for years. It's called a pistol grip TX and has a small wheel for steering and a trigger for the throttle and brake.
It is has fully adjustable and proportional trims for the steering and throttle/brake as can be seen above.

And here is the receiver (RX), that came with the transmitter, which is fitted with a fail safe. The fail safe will in the event it loses connection with the transmitter, it will stop the buggy there and then to prevent damage to the car. This two channel transmitter and receiver cost me £35 about five years ago but I do think they can be found at a cheaper price these days. The receiver is actually very small, very light and easily installed in an RC car. Again, there are many other companies that build decent and inexpensive TX and RX equipment but always ensure they are 2.4GHz and a fail safe. Again, this is an item I would buy from new as then you know it works and has a proven track record. After all, the buggy is an expensive item that you don't want going out of control and smashing itself up or hurting someone else. Again, don't be fooled into false economy.
Batteries
Both the car and the transmitter will require batteries. The transmitter (normally but not always), uses eight (8) "AA" batteries that can be found at the bottom or back of the transmitter.
As can be seen above. However, newer transmitters may have a rechargeable pack installed or may only use six (6) "AA" batteries. I have seen many versions over the years, yet the eight (8) "AA" batteries is the most common. Some people use rechargeable "AA" cells in place of the alkaline cells-
Which can then be directly recharged in the transmitter (if the transmitter has that function). By using rechargeable batteries in the transmitter will over time, save you money. However, you don't have to install rechargeable batteries in the transmitter as they don't use a lot of power and alkaline batteries can last just as long on a time basis, as rechargeable batteries.

Above is a picture of a typical battery type the RC car will run from. It is a six (6) cell, 7.2 Volt, Nickel Metal Hydride (NiMH) battery. This particular battery has a maximum charge capacity of 4000mAh.

The above pack has a capacity of 3000mAh.

And the above pack has a capacity of 6800mAh.
The capacity of the battery will determine how long the RC car will drive before the battery needs to be recharged. Therefore, I will get twice the running time from the 6800mAh battery than I would if using the 3000mAh battery. It also equates that the more capacity (mAh) the battery has, the more expensive it will be. Another factor to have in mind is that the higher the capacity, the longer the charge times will be. My tip would be to buy two lower capacity batteries rather than one high powered battery. Simply because if one battery fails, you will have a spare. I have seen the typical 2500mAh battery retail anywhere between £10 to £21 depending on the brand. Start small and only buy one at a time and try different brands would be my advice.

You will also need a charger for your 7.2 Volt NiMH battery. Or you could buy a full kit like the one above, with eight transmitter rechargeable batteries, a 3000mAh NiMH battery and charger for £22. However there are more attractive offers on a daily basis it seems. I would, at a later date, buy a dedicated RC car battery charger which can charge batteries a lot faster than standard chargers. They can also monitor the health of the batteries to ensure they are 100% ready to go. Again this is something for the future if you want to go further and faster!
How To Connect The Electronics
I still, to this day make mistakes wiring up the electronics in my RC cars with only two channels. I either get the throttle and steering mixed up or have them reversed. So I found a little diagram to help me out. I should also read the instructions of every component to the end.

It's not the clearest of pictures (I may make a new one or a small video) but it gives you the idea. I always set my new components up like this and test them on the bench before fitting to ensure correct operation and prevent having to strip it all out of the car again if it was wrong. Once the operation is proved a success, work out a placement for your components so the wiring will be as tidy as possible. I have seen many problems caused by untidy and loose wiring. Remember this car is going to be fast and shaking everything inside, keep it tidy and tied down or lose it. Believe me, I have seen some hilarious, heart breaking and wallet breaking calamities caused by loose and poor wiring. So work out your placing and routing of your wires, and then connect them up.
If you have followed my steps and carefully built the buggy as per the instructions, you should now be looking at a cost effective, reliable and rebuildable, hobby grade car.
As I previously stated, choosing and buying an RC can be confusing to say the least but, I hope this post has helped you see some choices of RC cars and the decent components you will require and the parts prices.
I say with confidence that most RC car racers, collectors or restorers started out with only one car. We all start somewhere.
I hope you have enjoyed and maybe learned a little about this great hobby.
Until my next post my friends, take care and stay safe!
catxls.com 2023
Comments