Cat XLS Masami 4WD New Build With All The Upgrades Available. Part 2 (Build Sequence)
15/05/21
Part 1 can be found here.
&
Part 3 can be found here.

Hello fellow RC enthusiasts from around the World and welcome to Part 2.

If you have not read Part 1, it can be found here.

In this second instalment, I will be taking the mountain of components I have purchased (above) and organise them into separate bags as per the original Schumacher Cat XLS Masami instruction book (U7153). Each bag will be numbered, the part identified and given a step sequence in accordance with the instruction manual.
There are thirteen main bags in total. These thirteen bags, have smaller component bags inside with their corresponding step, part number and bag number on marked on each. The size and quantity inside of each of the larger bags varies a lot. The numbering system I have designed seems to be very robust and trustworthy, even after three checks of every bag.
I have also written the part number on the manual to speed up identifying the parts. I will post relevant pictures of the manual with each bag stage, which will help identify, quantify and purchase each part.
Ok, let's go.
Bag 1 / Step 1 to 3

Steps 1 and 2 are shown above, yet in this build I will not be following step 2 (This is for your guidance only, if you wish to build a standard XLS). Instead, I will be skipping step 2
straight to step 3. The main reason is, that this build is designed to use a shorty lipo pack. Therefor step 2 is not used in my build. I will not be putting item prices in as I covered that in Part 1. However, If you wish to cross reference any part simply use the Schumacher RC Racing site HERE to find the price. This is where I bought the bulk of my parts. They are a great supplier and normally deliver within 48 hours.
Step 3

Step 1
U1042 antenna holder x 1.
U7263 C/F chassis x 1.
U7221 M3 x 12 (x 1).
Step 2
U7166 M3 x 20 (x 2).
U1547 M3 Nut x 2.
Step 3
U7259 M3 x 8 (x 2).
U7267 C/F lipo holder x 2.
U4778 lipo stops x 2.
U4768 thumb screw x 2.
U7090 M4 x 20 grub (x 2).
U7045 lipo post x 4.
U7219 M3 x 8 (x 4).

It took a very long time to pack each bag, however this will speed up identifying parts during the build. The total cost for this build, up to and including step 3 is £69.64. If I wasn't using carbon fibre parts, then I could have done it for less money, but that is not what I am aiming for. Each individual bag is also marked with it's own part number. This will make the build process so much quicker. Simply open the build manual and the bag and follow the corresponding instructions.
Bag 2 / Step 4

As you can see from step 4 in the manual above, the under tray needs to be cut and trimmed before the parts can be added.
Step 5

As you ban see from steps 4 & 5 above, all the parts for these stages are in Bag 2 and comprise of:-
Step 4
U7292 Alloy rear trans housing x 1.
U7140 Motor plate x 1.
U7241 Pro front belt x 1.
U7229 No4 x 3/8 (x7).
U5137 Under tray x 1.
Step 5
U7188 Bearing housing (1 of 2)(1 half).
U7226 No2 x 3/16 (x 8).
U7245 Alloy eccentric ring (1 of 2)(1 half).
Step 4 and 5 cost £67.44 and again were purchased from Schumacher RC Racing.
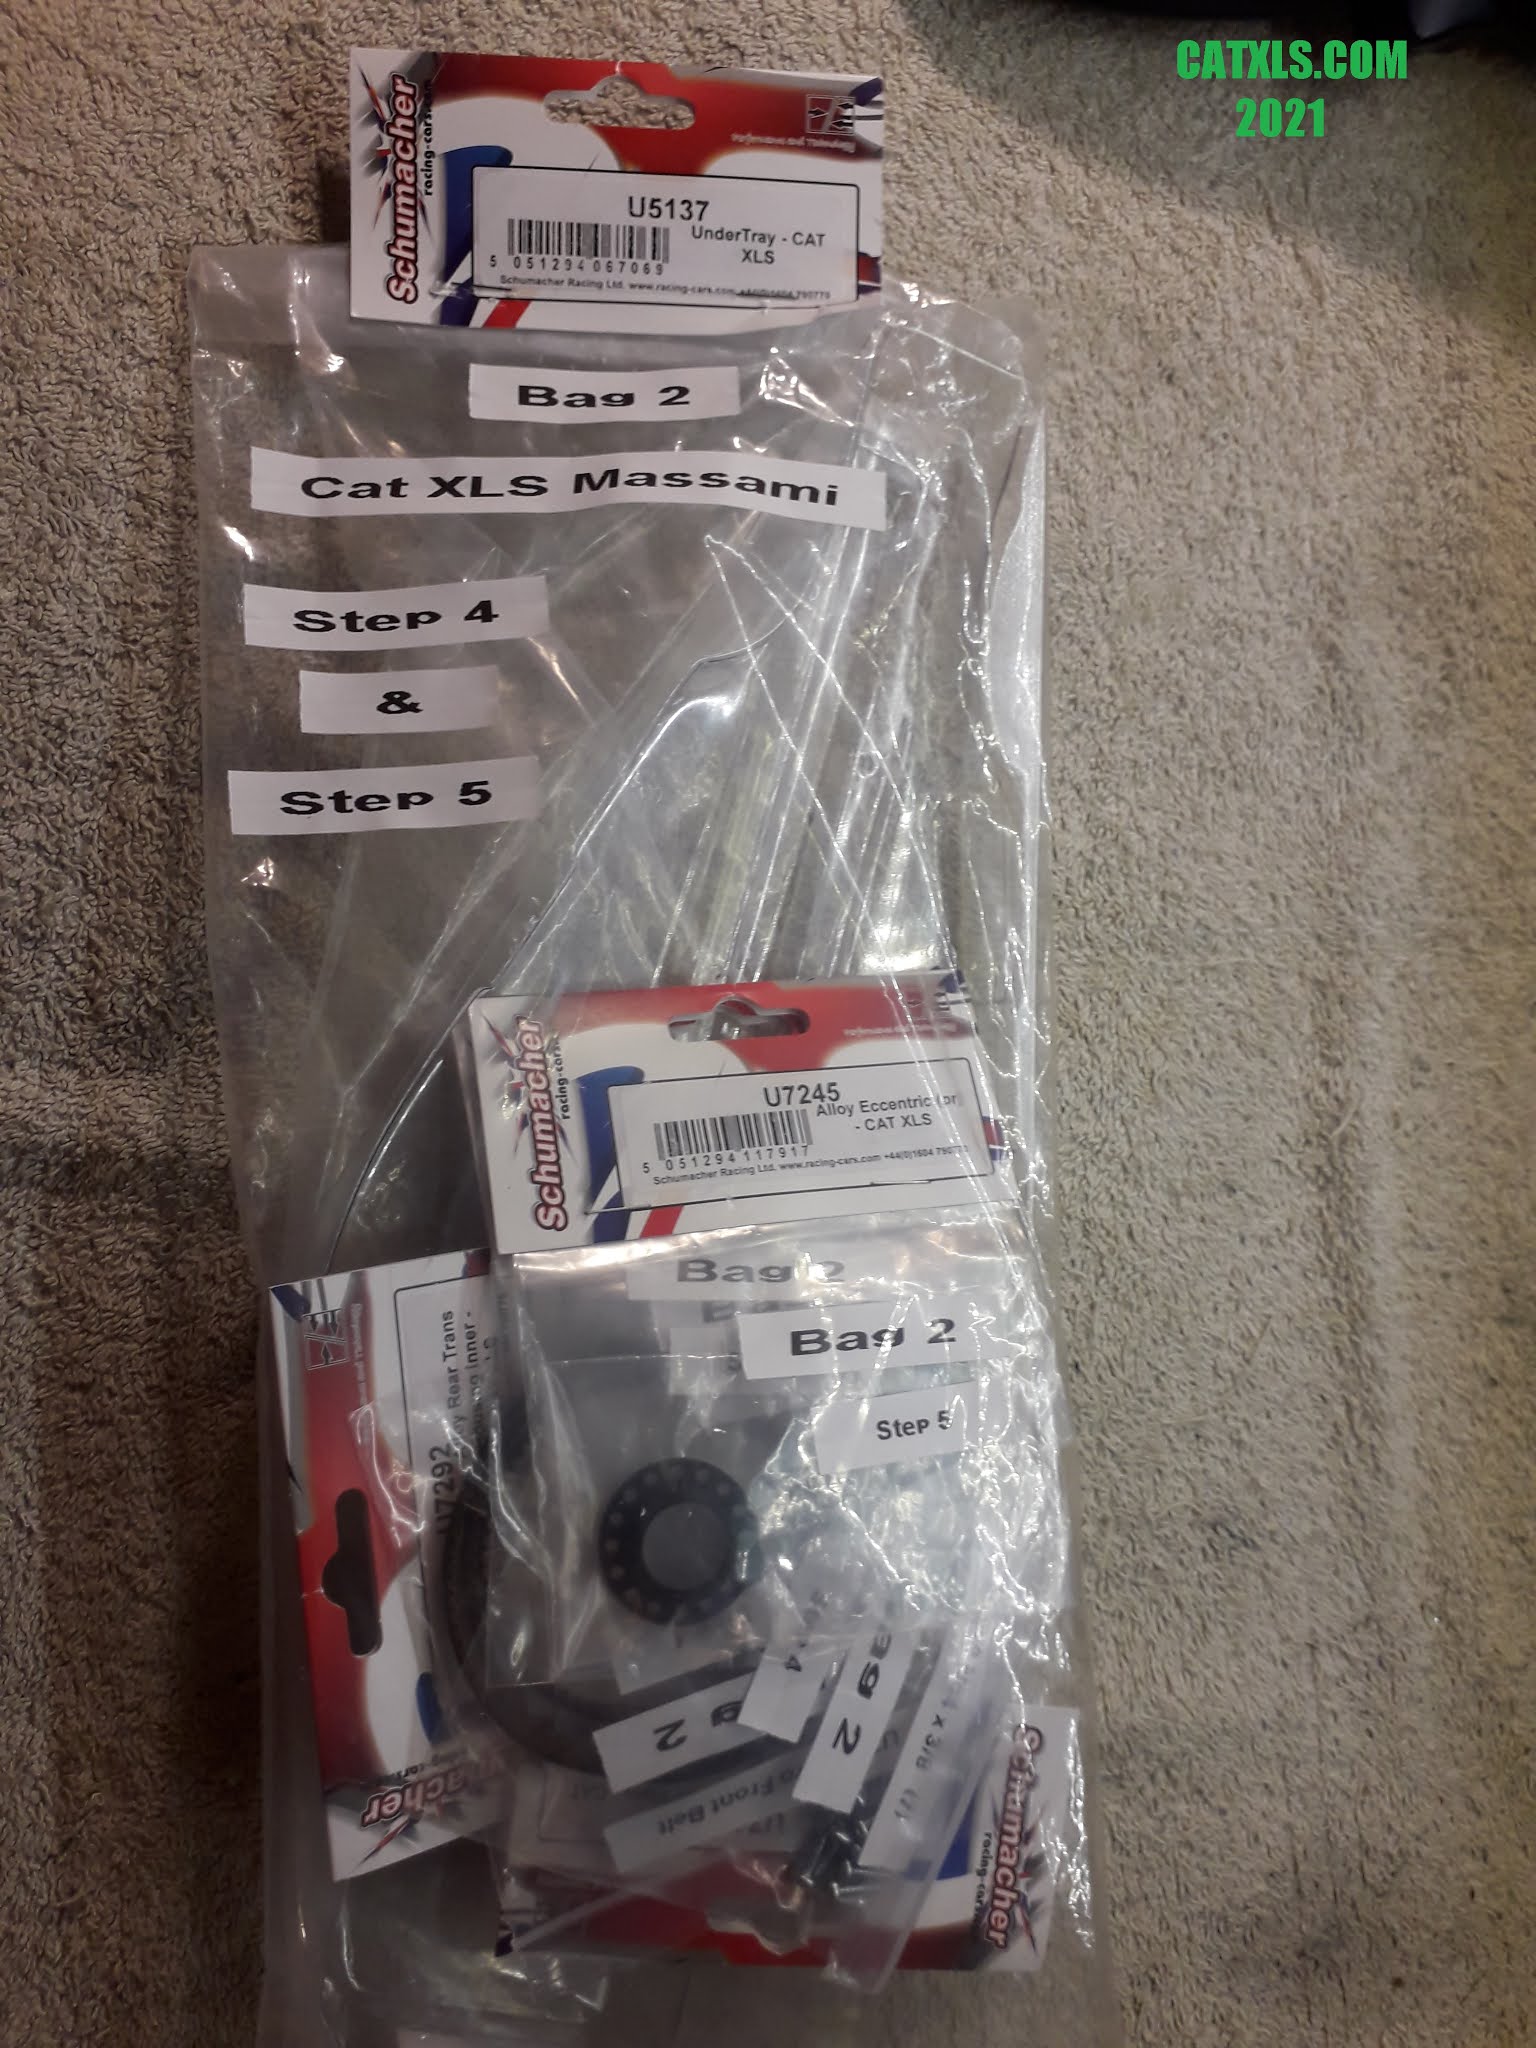
Above is a picture of Bag 2. If you look close enough you can see the smaller individual parts bags inside with their identification numbers printed on them. Again, I could have done these steps cheaper using standard parts, which are available. The cost of the parts so far is £136.98, if I added correctly. As I stated in part 1, this will be a very expensive project, so think carefully before committing to it, if you decide to follow my lead. You could also build up the parts in bags over time as I have done. This method spreads out the cost over time so your not giving piles of cash away in one go.
Bag 3 / Step 6 to Step 12
As I was working out the build sequence, it seemed logical to use this method and therefor gather those parts into the same sequenced bag. As it worked out Bag 3 would hold many parts needed in succession, hence the large amount of parts in one bag. It is also the most expensive parts bag in the build. As I have stated before, I am fitting the U7236 Pro Transmission therefor not only will I be following pages 6 to 10 (see below) from the K172 manual, I will also be using the instruction manual supplied (document S1464-ISS3) in the U7236 kit and is also shown below.

Step 6 and 7 above are for a standard Masami build.

Step 7b and step 8 above, again for a standard XLS build.

Steps 9 and 10 are again for a standard Cat XLS.

With the final standard steps of the standard transmission (10 and 11 pictured above), it was time to use the pro transmission instructions provided in the kit.
As I stated earlier I am using the Pro Transmission upgrade and the design is a lot different from the standard. It comes with it's own instructions (see below). When designing the build sequence, I simply put the upgraded parts in the sequenced bags in place of the standard parts. Now it is time to put the correct instructions in sequence.
As you can see page 1 of the upgrade transmission instructions above, there are some big differences. Obviously the main layout is the same, but the main components have been upgraded.
The final page of the pro transmission above. After I have completed building page 3, I can now revert back to the K172 manual on page 10, step 12 (see below).


Bag 3, pictured above and contains the many, many following components:-
Step 6
U7239 Pro lay shaft x1.
U7244 Black "O" ring x2.
U7239 Lay shaft fence x2.
U7155 8x16x5 Bearing x2
Step 7
U3869 Slipper plate x2.
U1547 M3 nyloc nut x1.
U1548 M3 washer x2.
U4106 Spring x1.
Step 8
U729 steel 3mm ball x12.
U4943 Bearing x3.
U7244 Black "O" ring x2.
U7155 8x16x5 bearing x2.
U7240 washer x2.
U4899 Shim x2.
Step 9
U4869 Belt fence x2.
U1547 M3 nut x1.
U7243 Alloy washer carriers x2.
U7238 Pro pulley x1.
U7184 Lay shaft bearing x1.
U7142 Integrator axle x1.
Step 10
U7144 Drive shaft x2.
U7152 UJ assembly x2.
Step 11
U7229 No4 x 3/8 screw x4.
U7141 Cover plate x1.
U7242 Pro rear belts x2.
Step 12
U7226 No2 x 3/16 screw x8.
U7188 Bearing housing x1. (1 of 2)
U7245 Alloy eccentric ring x1. (1 of 2)
As you will notice Steps 6 to 12 have repeating parts. This is due to them being needed at different stages of the build. This will be true of all the future bags and steps so I need not repeat myself. The total cost for Bag 3 was £133.51 and includes, up to and including Step 12. Also in step 12 you will notice only one half of the bearing housing (U7188) and eccentric rings (U7245) as the other parts are not required yet and are in Bag 4. This simply quickens up the process of looking for parts. The price of Bag 3 also reflects the true cost of each stage and each part used and not the item as a whole. For example the alloy eccentric rings are sold as a pair for £19.99, I price it at half that cost in that particular bag. Again, this method is used throughout the build structure.
Bag 4 / Step 13 to Step 15

In Bag 4 we have the polycarbonate belt cover (U5319), which will need cutting and shaping before any components can be fitted. When drilling the holes for the bolts, I must remember that the marks on the belt cover for the bolts are INCORRECT and will require aligning before drilling. I only know this as this is my second XLS build, so take heed if your building and don't follow my mistakes. Also in Bag 4 is the carbon fibre top deck of which I waited 8 weeks to find and purchase. I was losing faith in ever finding one.

In step 14 above, I will be required to solder on the ball ends to the anti-roll bar. I will go into further detail of this during the build. It is a good idea to become familiar with each and every step before commencing the build as there are hundreds of parts to identify.

As you can see Bag 4 above and contains the following components:-
Step 13
U5139 Polycarbonate belt cover x1.
U7264 C/F top deck x1.
U7229 No4 x 3/8 screw x4.
Step 14
U7167 Front anti-roll bar x1.
U7262 Anti-roll bar ball x2.
Step 15
U7228 No4 x 1/4 screw x2.
U7207 Anti-roll bar clamp x2.
The complete contents of Bag 3 came to £43.15, considering there are only seven components in this bag, it is quite expensive. Again if had not used carbon fibre I could have done it for less money.
Bag 5 / Step 16 to Step 19
As you know I am fitting a pro transmission kit so I will again be referring to both the supplement and main kit instructions. I have supplied the diagrams below.


Step 19b above shows the method for tightening the front belt. Again I will explain it in better detail during the build. No new parts are used in step 19b.

Above is a picture of Bag 5.

A picture of the components inside Bag 5, can be seen above and it's contents include:-
Step 16.
U7237 Pro front spool x1.
U4869 Spool fences x2.
U4943 1/8 x 1/4 Bearing x3.
Step 17.
U7243 Alloy washer carriers x2.
U7155 8x16x5 Bearing x2.
U729 Steel 3mm ball.
U1547 M3 Nut x1.
U4943 Shim x2.
U7142 Integrator axle x1.
Step 18.
U7152 UJ assembly x2.
U7293 Alloy front diff housing x1.
Step 19.
U7224 M3 x 40 bolt x4.
U7194 Front suspension brackets x4.
U1547 M3 Nyloc x4.
U1548 M3 Washer x4.
U7208 Front bumper x1.
The cost of the components in Bag 5 was £86.60. Normally, if I had used standard parts it would have driven down the cost, but not by a lot in this case. Most of the above parts are essential to make a complete kit and make it ready to build. At every stage, every component, needs to be there and ready to use, in "KIT" form and in this case, K172.
Bag 6 / Step 20 to Step 22

As you can see Bag 6 above, with the parts to complete steps 20, 21, 22 & 23.

As you can see in the diagram below I will not be using U7168 Wire wing holder. Instead I bought the official Schumacher XLS off road wing holder U3850 and is a plastic design and looks a lot better than the wire version.

The diagram above shows steps 21 and 22 with all original Schumacher parts.

The diagram above shows step 23.
The contents of Bag 6 is as follows:-
Step 20
U7229 No4 x 3/8 screw x8.
U3850 Off road wing mount kit x1.
U7186 Rear suspension bracket x2.
U7191 Wire wing holder x1.
U7266 C/F Rear suspension support x1.
U7198 Rear transmission cover x1. (added 14/6/21) x1
Step 21
U7163 55mm Stud x1.
U7169 Spacer x1.
U1547 M3 Nut x2.
U7201 Rear pivot block x1.
Step 22
U7201 Rear pivot block x2.
U7169 Spacer x2.
U7162 Lower pivot pin x1.
U7180 Lower wish bone x1.
U7232 No4 x 1/4 screw x2.
Step 23
U7162 Lower pivot pin x1.
U7180 Lower wish bone x1.
U7232 No4 x 1/4 screw x2.
Bag 6 is again, are all necessary components but I could have saved some money if I wasn't using carbon fibre parts. The total cost of the components for Bag 6 was £57.24
Bag 7 / Step 24 to Step 26

As you can see above is Bag 7, which is quite a small bag of components. I intended this to happen whilst designing the build method and keeps separate build parts. It also makes the parts easier to find.

A diagram of Step 24 above.

Above is a diagram of Steps 25 & 26.
Bag 7 contains the following components:-
Step 24
U7196 Upper & lower front wish bone spacer x2.
U7231 No4 x 3/4 Screw x2.
U7195 Front pivot bracket x1.
U7159 Crash back pin x1.
U7185 Front upper wish bone x1.
Step 25
U7196 Upper & lower front wish bone spacer x2.
U7231 No4 x 3/4 screw x2.
U7195 Front pivot bracket x1.
U7159 Crash back pin x1.
U7185 Front upper wish bone x1.
Step 26
U7217 Crash back "O" rong x3.
As I stated earlier this is quite a small quantity bag and is one of the least expensive at £18.70
Bag 8 / Step 27 & 28

Above is a picture of Bag 8. Again the contents of this bag is small to aid with the build process.

Above is a diagram of steps 27 & 28.
Again amount of components in the bag is small and will save a lot of time identifying parts.
The contents of Bag 8 are:-
Step 27
U1960 "O" ring x2.
U7196 Bottom wish bone pivot x1.
U7229 No4 x 3/8 screw x2.
U7161 Front lower pivot pin x1.
U7180 Lower wish bone x1.
Step 28
U1960 "O" ring x2.
U7196 Bottom wish bone pivot x1.
U7229 No4 x 3/8 screw x2.
U7161 Front lower pivot pin x1.
U7180 Lower wishbone x1.
This was the least expensive bag out of the 13 main bags and cost £12.20 in total. I wish all the bags had the same price tag.
Bag 9 / Step 29 to Step 31

Above is a picture of Bag 9 and it has quite a number of items in the bag. There will be four smaller bags inside as these are the wheel hubs, the only difference being 2 are for the front and 2 for the rear.

A diagram of Step 30 above and is a rear hub.

Step 30 above is another rear hub.

Step 31 above is a diagram of a front hub.

Bag 9 was quite expensive, and these steps needs all of the components to complete. The most expensive parts were the bearings (U7155), as we require 8 in these next steps. Precision bearings at the best of times are never cheap, so I was expecting the price of the parts.
The contents of Bag 9 are:-
Step 29
U7220 M3 x 10 Bolt x3.
U7200 Rear hub x1.
U1547 M3 Nyloc x1.
U7179 Upper wish bone x1.
U7150 Pivot ball x3.
U7155 8x16x5 Bearing x2.
Step 30
U7220 M3 x 10 Bolt x3.
U7200 Rear hub x1.
U1547 M3 Nyloc x1.
U7179 Upper wish bone x1.
U7150 Pivot ball x3.
U7155 8x16x5 Bearing x2.
Step 31
U7220 M3 x 10 Bolt x3.
U7199 Front hub x1.
U1547 M3 Nyloc x1.
U7179 Upper wish bone x1.
U7150 Pivot ball x3.
U7155 8x16x5 Bearing x2.
Step 32
U7220 M3 x 10 Bolt x3.
U7199 Front hub x1.
U1547 M3 Nyloc x1.
U7179 Upper wish bone x1.
U7150 Pivot ball x3.
U7155 8x16x5 Bearing x2.
There are a lot of parts in this bag but are repeats of each other as we need 4 hubs. The cost of the components in Bag 9 Is £56.16. Considering it's mostly plastic, it is expensive.
Bag 10 / Step 33 & Step 34

Above is a picture of Bag 10, containing the components to complete steps 33 & 34.

Above is a diagram of step 33 of the 2 hub assembly for both left and right REAR hubs.

With another diagram for step 33 for the front 2 hubs.
The components stored in Bag 10 are as follows:-
Step 33
U7160 Upper pivot pin x2.
U7227 No2 x 1/2 Screw x8.
Step 34
U7165 M3 x 16 Bolt x2.
U1547 M3 Nut x2.
U7229 No4 x 3/8 screw x4.
U7191 Transmission spacer x1.
U7265 C/F Rear shock mount x1.
The most costly part in bag 10 was the carbon fibre shock mount. I have to say the fibre glass part is also quite expensive. The total cost of the components in Bag 10 is an agreeable at £15.18. Again< I wish all the bags were at this cost.
Bag 11 / Step 35 to Step 41

Above is a picture of Bag 11. This bag contains all of the shock absorber components and was very expensive. However, you get what you pay for and these shock absorbers are fantastic. I would go so far to say the best model car shock absorbers I have had the pleasure to build. I also purchased the U7172 shock rebuild kit as it has everything in it to build the shocks. With this method there is no need to buy everything separate.

Above is a diagram of steps 35 and 36. These are the rear shocks and will be built as a pair.

A diagram of step 37 above describes filling the rear shocks with oil and fitting the plastics and springs.

The diagram above shows steps 38 and 39 and is simply a repeat of the rear shocks. It is exactly the same process.

In step 40 (above), it once again describes filling the shock with oil and fitting the spring.

In step 41 above, it shows how to connect the shock assemblies to both the front and rear of the car.
The contents of Bag 11 is as follows:-
Step 35
U7172 Shock rebuild kit x1.
U7145 Rear shock bodies x2.
U7171 Shock bush x2.
Step 36
U7148 Rear shock shaft x2.
U7177 Rear shock piston x2.
Step 37
U7273 Rear shock spring x2.
U7210 Shock sockets x2.
U7147 Shock cap x2.
U7261 Shock mouldings x2.
Step 38
U7171 Internal shock bush x2.
U7172 Shock rebuild kit x1.
U7146 Front shock body x2.
Step 39
U7149 Front shock shaft x2.
U7176 Front shock piston x2.
Step 40
U7210 Shock sockets x2.
U7147 Shock cap x2.
U7272 Front shock spring x2.
U7261 Shock mouldings x2.
Step 41
U7170 Shock top bush x4.
U1548 Black washer x4.
U1547 M3 Nyloc x4.
U7164 M3 x 12 Bolt x4.
U1548 White washer x4.
U7165 M3 x 16 Bolt x2.
There are a lot of components in this bag, some inexpensive and some quite expensive. The shock bodies and the shock caps were the most expensive. The components in Bag 11 were £91.03, which for a set of shockers is expensive. That works out at £45 a pair.
Bag 12 / Step 42 to Step 46

Above is a picture of Bag 12, step 42 to 46. Although the bag looks empty, it is full of tiny components and a ball raced steering upgrade from Muzzoom Models.

Above is a diagram of steps 42 and 43 and details the steering assembly and build.


Above is a diagram of step 45b and 46, detailing the assembly of the front turnbuckles.
The contents of Bag 12 are as follows:-
Step 42
U1548 M3 Washer x2.
U7220 M3 x 10 Bolt x2.
U7190 Steering mouldings x1.
U7268 C/F CTR x1.
U7150 Pivot ball x2.
U7222 M2 Nut x2.
U7258 M2 x 16 Bolt x2.
U7225 M2 Washer x2.
U7151 Steering posts x2.
Step 43
U7222 M2 Nut x2.
U7258 M2 x 16 Bolt x2.
U7225 M2 Washer x2.
U7151 Steering posts x2.
Step 44
U3131 Spacer 2mm x2.
U7165 M3 x 16 Bolt x2.
I7150 Pivot ball x2.
Step 45
U4299 52mm Turnbuckle x2.
U4222 39mm Turnbuckle x2.
U7209 Ball sockets x8.
Step 46
U7223 M3 x 12 Grub x2.
U7150 Pivot ball x2.
As I said earlier Bag 12 looked empty but is in fact quite busy. The cost of components in Bag 12 was £63.65. The Muzzoom steering upgrade was the most expensive item in Bag 12 but it will be worth it.
Bag 13 / Step 47 to Step 51.

Above is a picture of Bag 13 step 47 to 51.


In step 49 above, it shows the installation of a servo and a push rod.

In step 50, it instructs on how to fit a pinion gear and a chart to help choose the correct size as a pinion is not supplied in the original K172 kit.

The content in Bag 13 is as follows:-
Step 47
U7191 Trans spacer x1.
U7192 Servo mount x2.
U7229 No4 x 3/8 screw x6.
U7268 C/F Servo spacer x1.
Step 48
U1548 White washer x2.
U1960 "O" Rings x4.
U7173 Wing mount clamp x1.
Step 49
U3495 Ball studs x2.
U7229 No4 x 3/8 screw x2.
U1548 M3 Washer x3.
U4297 30mm Turnbuckle x2.
U4968 Ball socket x2.
U7220 M3 x 10 Bolt x1.
U1547 M3 Nut x2.
Step 50
U7218 M3 x 6 Bolt x2.
U1548 M3 Washer x2.
Step 51
U7166 M3 x 20 Bolt x4.
U7182 Front wheel x2.
U7181 Rear wheel x2.
T652 Front tyre x2.
T650 Rear tyre x2.
Step 52
U1536 Upper body shell x1.
U5140 Transmission cover x1.
Again all of these parts are essential to the completion of the kit. The total price of Bag 13 is £71.16 and again I think it's expensive.
And that is the end of the official manual.
Bag 14

With no official instructions, I packed these 2 upgrades in Bag 14.
Bag 14 includes the following components:-
U7235 Rear anti roll bar complete x1.
U7294 Alloy rear trans spacer x1.
The components in Bag 14 cost £31.49 and an absolute must for this build.
Some Pointless but Interesting Statistics,
The kit uses:-
9 different size screws
10 different size bolts
86 screws
40 bolts
28 washers
most common screw is U7229 with 37 of them needed
A total of 203 nuts, bolts, washers, screws and spacers
Total costs of fastenings was £47.91 and not the £15 ones available on Ebay, which are bespoke for nothing and are simply generic fastenings.
This post is now complete and will not be updated any further unless further information is received from any other source.
Well guys, I hope I didn't bore you too much and I hope this helps anyone in any way.
Thank you for reading.
If you have not read the previous and following posts, please follow the links below:-
&
Take care my friends from around our world!
Mr.B / CATXLS
15/5/21
<script async src="https://pagead2.googlesyndication.com/pagead/js/adsbygoogle.js?client=ca-pub-6000357390305251"
     crossorigin="anonymous"></script>
Comments